Assembling a Sequence

SEQUENCES
A Sequence is made up of sections of clips, images, audio and subclips cut together on a single timeline. They contain at least one Video or Audio track. Sequences can have a maximum of 64 Video tracks, up to 32 Audio tracks with unlimited FX tracks. Multiple sequences can exist inside a Lightworks project and sequences can be used within another sequence, the same way a clip or subclip can.

Sequences are identified by a red flag in the top left corner of tiles, thumbnails, and viewers.

Each sequence has its own output format. This can be viewed/changed by right-clicking on a sequence and amending the 'Playback format'. The initial output format for a sequence is determined by the first clip inserted into it. If the first clip is inserted is 25fps then only 25fps output formats will be available.
 
Sequences-1
 
You can also specify that a new/empty sequence has an 'auto' frame-rate so that it adopts the frame-rate of the first clip that's inserted into it.

The sequence frame rate can be changed when making a copy of a sequence. Right click the sequence viewer or timeline and choose: Make > Copy.
 

Sequences-2


Creating a Sequence

 
STEPS

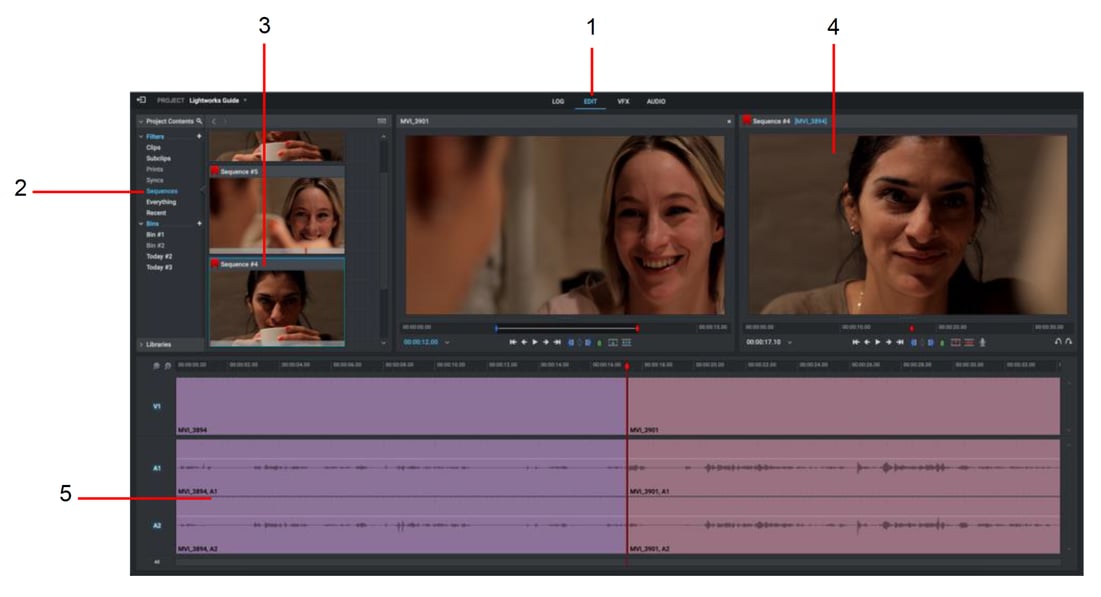
1. Click on the Edit tab. New projects always open with a blank sequence that is an 'Auto' sequence, which means that no frame rate is currently allocated to the sequence. New sequences can be created by right clicking an empty area of a bin and selecting either: 

Make -> Empty sequence or: Make -> Sequence from contents  

2. Select a Filter or Bin within the Content Manager to display your media.

3. Select the first clip you want in your sequence and double click it to open it into a Source viewer.

4. Mark and Park the section of the clip you want in your sequence.

5. Click the Insert icon on the sequence viewer to move the marked selection into the empty sequence 

6. The timeline marker will move to the start of the inserted section. You can then decide where you want the next clip to be inserted by moving the position of the timeline marker:

• Leave the timeline marker where it is to insert another clip before the previous clip.

• Press the shortcut key to move the timeline marker (to the end of the clip) to insert another clip after the previous clip. 
Default Shortcuts: a = move to previous cut  s = move to next cut
6. Select the next clip you want in your sequence and load it into the Source viewer.

7. Repeat steps 4 to 6 to add further clips as required.
 

Opening an Existing Sequence

Sequences that exist within the project can be found within the ‘Sequences’ filter, they can also be manually added to bins within the project.
 
Opening-an-Existing-Sequence
 
STEPS

1. Click on the Edit tab to reveal the Sequence view.

2. Click on ‘Sequences’ Filter to display the sequences in your project.

3. Double-click on the Sequence you want to open or drag and drop the tile into the sequence viewer.

4. The Sequence displays in the sequence viewer.

5. The video and audio tracks for each clip and subclip in your sequence display in the timeline.


Resources and Support

Troubleshooting

If you experience an issue with your Lightworks installation or something isn't working as expected, visit our FAQ page. If you do not find an answer to your question, you can refer to the Lightworks forum.

The Status window provides useful information for troubleshooting issues with Lightworks. You may be asked to open this when contacting the forums.