STEPS
1. Click on the Audio tab. The Audio Mixer displays in the top right area of the desktop.
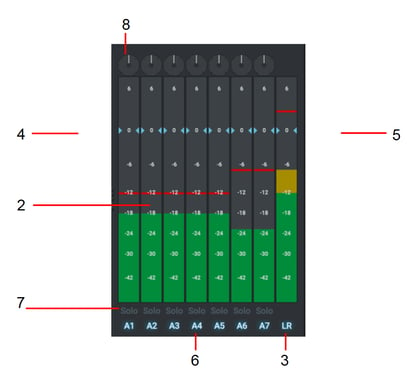
2. The Audio Mixer displays all the available audio tracks, each with its own sound level indicator.
3. The track for the mixer output is labelled LR.
4. To adjust the sound level for each track, slide the adjacent (blue) volume control up or down. Left-click on the track to reset it to its default level.
5. To adjust the overall sound level, slide the LR volume control up or down. Left-click on the LR track to reset it to its default level.
6. Click the track indicator to alternatively enable or disable its output.
7. To monitor the output of one track and mute the other tracks, click on the Solo button for the track you want to hear. The Solo button illuminates to indicate that it is selected.
8. To change the spatial positioning of the track right or left, drag the balance control pointer clockwise or counter-clockwise.
Troubleshooting
If you experience an issue with your Lightworks installation, or something isn't working as expected, visit our FAQ page. If you do not find an answer to your question, you can refer to the Lightworks forum.
The Status window provides useful information for troubleshooting issues with Lightworks. You may be asked to open this when contacting the forums.