
Importing brings clips into your project so you can view, organise, and edit them. Lightworks never modifies your source files: an import either links to the original file where it lives, or copies it into your project's media storage. The original is always left untouched.
This article covers the Import panel, the two import methods, supported file types, camera cards, image sequences, interchange formats, and how to diagnose imports that fail.
How importing works
When you import a file, Lightworks analyses it and creates a clip - a project item that references the media. The clip carries the file's metadata: format, dimensions, frame rate, audio channels, and timecode.
Three things to understand from the start:
- Clips are references, not files. Deleting a clip from a bin does not delete media. Deleting the source file from disk does break a linked clip.
- Imports run as background tasks. Large imports (especially copies) proceed while you keep working. The Tasks display appears as soon as you press Import, so you can see straight away that the job has started, and progress appears there as files are dealt with. Close the panel and it stays closed - a single import goes on to spawn follow-on work such as localising and transcoding, and it will not reopen for each of those (see Batch export and background tasks).
- Importability is checked up front. The import list flags every file before you start: files that cannot be imported are shown in red, and files that need a licensed codec or conversion are highlighted, so there are no surprises mid-import.
Opening the Import panel
There are several ways to start an import:
- Press
F1, orCtrl+I(Cmd+Ion macOS) - the fastest route, available everywhere in a project. - Click the Import button in the footer of a bin or the Content Manager.
- Right-click in a bin and choose Import.
- Drag files straight in from your operating system's file manager (see Drag and drop import below).
If you open Import from a specific bin, that bin is pre-selected as the destination for the imported clips.
The Import panel
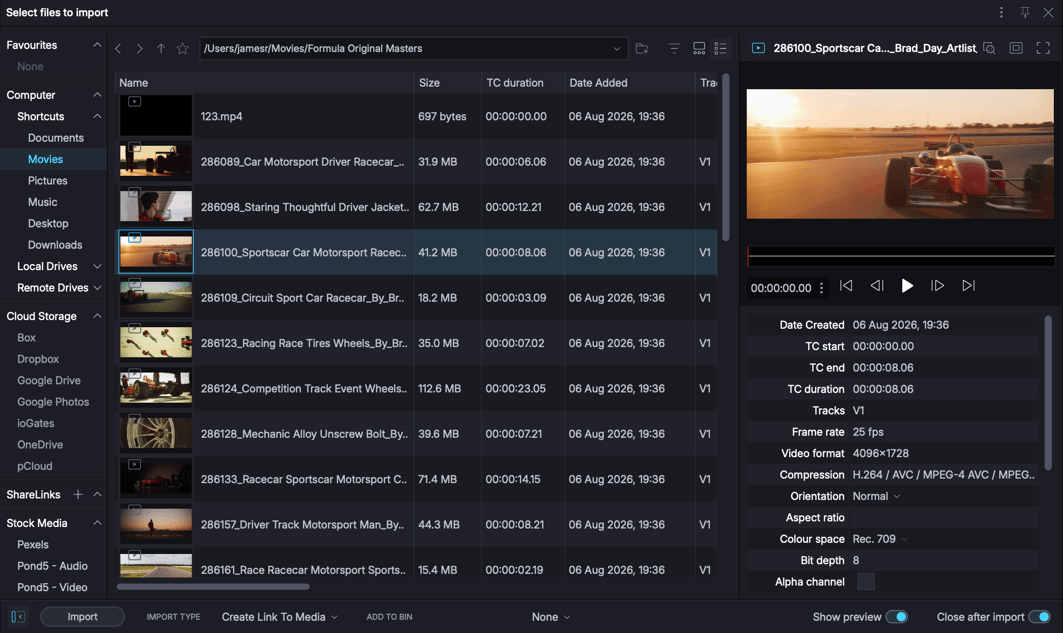
The Import panel is a media browser with a navigator down the side and a file view in the middle.
Sources
The navigator lists the places you can import from:
- This Computer - local drives, external drives, and network locations.
- Devices - connected hardware sources, where supported.
- Cloud and share-link sources - remote repositories you have connected, where your licence supports them.
The panel remembers your last-used location, so repeat imports from the same folder are quick.
The file list
The file view shows importable files with thumbnails or as a table. For each file you can see its name, format, frame rate, and content. Colour-coding tells you the status:
- Normal text - ready to import.
- Yellow - importable, but only by converting it (Lightworks handles the conversion for you).
- Red - cannot be imported (unsupported format, unlicensed codec, or incompatible frame rate).
Select multiple files with Ctrl-click (Cmd-click on macOS) and ranges with Shift-click. Selecting a folder imports its contents, including subfolders.
Footer controls
- Import - starts the import of the selected files.
- Import type - chooses the import method (see below). Your choice is remembered as the default.
- Add to bin - choose None, an existing bin, or New Bin, which reveals a name box so you can create and name the destination bin as part of the import.
- Preview - toggles the preview area, where you can inspect a file before committing.
- Close after import - when enabled, the panel closes as soon as the import starts. The panel can also stay open during longer import sessions.
Import methods
Lightworks offers two import methods. The right choice depends on where your media lives and what you plan to do with it.
| Method | What it does | Trade-offs |
|---|---|---|
| Create Link To Media | References the file where it is; nothing is copied | Fastest, no extra disk space, but the clip goes offline if the file moves or its drive disconnects |
| Copy Media To Project | Copies the file into your project's media storage | Project no longer depends on the original location; uses disk space and takes time |
Create Link To Media
Use a link when media is on a fast, permanently connected drive and you control the folder structure.
Copy Media To Project
Use a copy when importing from camera cards, USB sticks, network locations, or any drive that will not always be connected.
Choosing between link and copy
A simple rule: link what stays, copy what leaves. If the drive or card the media is on will ever be unplugged, copy. If the media lives permanently on your edit storage, link. You can set the method per file in a batch before starting.
Formats that need conversion
A few formats can't be used directly and are converted automatically during import - some compressed audio such as MP3, for example. These show Transcode as their method in the import list, and it can't be changed; everything else about the import works as normal.
Supported file types
Lightworks imports a wide range of media. Exact codec availability varies by platform and licence tier; the import list always shows you definitively whether a given file can be imported.
Video
Common containers and formats include MP4, MOV, MXF, AVI, and MTS/AVCHD, with professional codecs such as ProRes and DNxHD/DNxHR, and camera-native formats including RED R3D, Blackmagic RAW, and ARRIRAW where supported. Files using codecs outside your licence are flagged in the import list rather than failing silently.
Audio
Supported audio-only formats include WAV and AIFF/AIFC (uncompressed, the safest choices), MP3, M4A/AAC, OGG, and FLAC (compressed), plus legacy formats such as AMR, AU, RA, and CDA. Some compressed audio formats are imported by transcoding automatically.
Still images
Supported image types include PNG, JPEG, TIFF, BMP, HEIF/HEIC, SVG, GIF, OpenEXR, and camera raw formats such as DNG. Images with alpha channels keep their transparency, which makes PNG and EXR useful for logos and overlays.
Interchange and project formats
Lightworks can also import edit data, not just media:
- EDL - edit decision lists.
- AAF - sequences and media references from other systems, where the AAF component is available with your licence.
- XML - interchange from other editors, where available.
- OMF - audio interchange (OMF1 and OMF2).
- ALE - Avid Log Exchange metadata.
- Subtitle files - imported onto the subtitle system.
- Lightworks archives and legacy projects - restored through the same import mechanism.
Importing camera cards
Professional cameras write structured card layouts rather than simple files. Lightworks understands the common card structures and presents the card's clips cleanly, hiding the housekeeping files. Recognised card families include P2, AVCHD, XDCAM HD and XDCAM EX, Sony XDCAM and Alpha-series, Canon (including XF), RED, JVC, GoPro, and Ikegami FieldPak.
Detect card structures in the import options controls this. With it enabled (the default), navigating to a card shows you clips; with it disabled, you see the raw folder contents.
Good practice for cards:
- Copy the entire card to local storage first - the whole folder structure, not just the clip files. Spanned clips and metadata depend on the structure.
- Import from the copy, not the card.
- Use Copy Media To Project so the project does not depend on the card copy staying where it is.
Warning: Do not reformat a card until the import has finished and you have verified the clips play.
Importing still images and image sequences
Single stills
A single image imports as a clip with a fixed duration - 60 seconds by default. You can change this in the import options (Stills duration), with choices from 1 second upwards. The clip plays as a freeze frame, so you can cut any portion of it into a sequence. Imported stills take the project's default video frame rate.
Image sequences
A numbered run of image files (frame_0001.png, frame_0002.png, and so on) is detected automatically and offered as a single clip, marked (Sequence) in the import list. Detect image sequences in the import options controls this. Turn it off if you genuinely want each numbered frame as a separate still.
GIF
Animated GIF is treated as a video file rather than a still, so animations import with their motion intact.
Importing audio
Audio files import like any other media - the same link or copy choice applies. Points worth knowing:
- Audio-only files are listed with their format and channel layout.
- Multi-channel and stereo files import with their channels intact.
- Some compressed audio formats (such as MP3) are converted automatically on import.
- Waveform and level analysis happens after import, so waveforms may take a moment to appear on the timeline.
- A default frame rate is assigned to audio clips (audio has no inherent frame rate); this follows the project's default rate setting.
Importing EDL, XML, AAF, and interchange formats
Interchange files describe edits - they reference media rather than contain it. Importing one creates sequence and clip structures in your project, then tries to find the media those structures point to.
Media relinking on import
The Interchange options control how hard Lightworks searches for the referenced media:
- No scan - import the structure only; relink media manually afterwards.
- Simple scan - look in the obvious places (alongside the interchange file and in standard media folders).
- Thorough scan - search more widely. Slower, but finds media in less conventional locations.
ALE matching
For ALE imports, separate match tolerance settings control how strictly clip and track metadata must match before Lightworks links the ALE data to existing clips.
Practical advice
- Put the interchange file and its media in one folder tree before importing - Simple scan will then find everything.
- AAF and XML support depends on the relevant component being present with your licence.
- After an interchange import, check the resulting sequence against the source system: effects and transitions rarely translate perfectly between editors.
Drag and drop import
You can bypass the Import panel entirely:
- Drag files or folders from your file manager into the Lightworks window. Drop them on a bin to import into that bin.
- Drag a URL from a web browser - Lightworks can treat a dragged remote file as an importable source.
Dropped files are imported using your current default import method. For large or critical imports, the Import panel is still the better tool, because you can review formats, frame rates, and methods before committing.
Handling mixed frame rates and resolutions
Frame rates
Every video clip has a native frame rate, and every sequence has a fixed frame rate.
- Clips of any supported rate can usually be edited into the same sequence; Lightworks conforms playback to the sequence rate.
- The Default frame rate import option sets the rate assigned to clips with no inherent rate of their own (stills and audio).
- If a file's rate genuinely cannot be used in the current project, the import list shows its frame rate in red and the file cannot be imported until the conflict is resolved.
Resolutions
Mixed resolutions are not a problem at import time. Lightworks imports media at its native size; clips are fitted to the sequence format at edit time, and you can reframe or scale per clip. Import the highest quality you have and make sizing decisions in the edit.
Spanned and split files
Long recordings split across multiple MXF files can be joined automatically - Detect split MXF files coalesces them into one clip. Stereoscopic left/right file pairs can similarly be detected and combined when 3D support is enabled.
Where imported clips appear
After import, clips are revealed according to the Reveal imports in option:
- Recent filter - imports appear in the Recent group in the Content Manager (the default).
- Search results - each import produces a search-results view of the imported items.
Independently, the Add to bin control places imported clips into a bin of your choice, including a brand new bin named at import time. If you launched Import from a bin, that bin is the preset destination.
Advanced import options
The import options (cog menu on the Import panel) collect settings that change how files are presented and imported:
- Detect image sequences - coalesce numbered stills into sequence clips.
- Detect split MXF files - join spanned MXF recordings into single clips.
- Detect stereoscopic pairs - combine left/right 3D file pairs (shown when 3D features are enabled).
- Detect card structures - present camera cards as clips rather than raw folders.
- Stills duration - the clip length given to imported single images.
- Default frame rate - the rate assigned to stills and audio imports.
- Reveal imports in - where newly imported clips appear.
- Interchange options - AAF/XML media scanning and ALE match tolerances.
- Destination drive - which media drive receives copied media (and any automatically converted files), where multiple drives are configured.
Common import problems
A file is shown in red and cannot be imported
The format or codec is not supported, or not supported by your licence tier. Check the Format column. If the file is shown in yellow instead, it can still be imported - Lightworks converts it automatically.
A file imports but the clip is silent or black
The container imported but one stream inside it uses an unsupported codec. Convert the file externally to a mainstream format and re-import it.
Clips went offline after I disconnected a drive
They were imported with Create Link To Media, so they reference files on the missing drive. Reconnect the drive, or re-import critical media with Copy Media To Project. Relinking tools can repoint clips if files have moved - see Media management.
A camera card shows folders instead of clips
Either Detect card structures is disabled, or the card structure is incomplete - commonly because only the clip files were copied, not the full folder tree. Re-copy the entire card.
An image sequence imported as hundreds of stills
Detect image sequences is turned off. Enable it and revisit the folder - the files will coalesce into a single sequence clip.
A file is flagged as corrupt
Lightworks quarantines files that fail analysis so they do not repeatedly stall the browser. If you believe the file is good, right-click in the import file list and choose the re-analyse option to scan it again.
An EDL or AAF import produced a sequence full of offline clips
The referenced media was not found. Raise the media scanning option to Thorough, or move the media next to the interchange file and re-import.
Good import habits
- Decide link vs copy before you start - link what stays, copy what leaves.
- Copy cards completely - always copy the whole card folder structure, and verify before reformatting.
- Name the bin at import time - use Add to bin > New Bin so every import lands organised.
- Let analysis finish - waveforms, thumbnails, and metadata are generated after import.
Note: Import is not backup. Whatever method you choose, your camera originals should exist in at least one other place.
Quick reference
| Action | Windows / Linux | macOS |
|---|---|---|
| Open the Import panel | F1 or Ctrl+I |
F1 or Cmd+I |
| Add file to selection | Ctrl+click |
Cmd+click |
| Select a range of files | Shift+click |
Shift+click |
| Import from file manager | Drag and drop | Drag and drop |