
A sequence is your edit: clips, audio, and effects cut together on a timeline of video and audio tracks. This article covers creating and opening sequences, how tracks work, and how to move around the timeline.
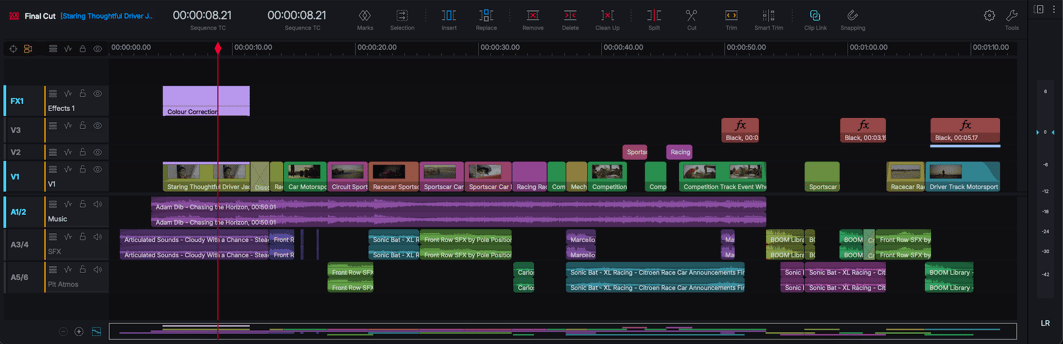
Creating a sequence
Every new project opens with an empty sequence ready in the timeline. You can create more sequences at any time:
- Right-click an empty area of a bin and choose New > Sequence.
- Or select some clips first and choose New > Sequence from selection to build a sequence from them.
- With a source clip open, marking a section and pressing Insert or Replace also creates a new sequence when none is open.
A brand new sequence is an Auto sequence: it has no frame rate until the first clip is added, then adopts a compatible format. The first clip you insert sets the sequence's output format (see Project settings reference).
Opening a sequence
Sequences live in the Sequences filter and any bins you file them in. To open one, double-click it or drag it into the sequence viewer. Its tracks appear on the timeline, ready to edit.
Understanding tracks
A sequence is built from stacked tracks:
- Video tracks (
V1,V2, ...) - higher-numbered tracks sit above lower ones, soV2coversV1. - Audio tracks (
A1,A2, ...) - play together through the mixer.
A sequence can hold many tracks (up to 24 video and 32 audio), plus effects tracks. Build up in layers: base picture on V1, cutaways and titles above, dialogue and music on separate audio tracks.
Track headers
Each track has a header at the left with its controls. In v2026 the headers were redesigned and include:
- Abbreviated names (
V1,A1) - the full-height button down the left of the header. Clicking it enables or disables the track for editing, so it doubles as the track state (targeting) control, and it lights in the theme accent colour while the track is targeted. While you have clips selected or a trim open, the tab shows what that is aimed at instead - so the header always describes the edit in hand. Your own track state comes straight back when you deselect. A locked track reads as untargeted and its button does nothing. - Custom labels you can type over the default name; clearing your text restores the default.
- A Track Options menu for track-level commands.
- Keyframes (on/off), Lock, and Monitor (visibility/mute) buttons.
- A Track Sync strip - a slim amber marker that lights when the track will be held in sync as material moves. It lights only when the edit will actually move the timeline, so it never promises something that will not happen (see Trimming).
- A PPM meter on audio track headers.
- Minimise / Expand to collapse or grow a single track's height.
The header buttons share consistent modifiers:
- Click toggles the button for that track and its grouped tracks.
Cmd/Ctrl+click solos that track, making it the only one - only that track targeted, only that track unlocked, or only that track visible or audible. Repeat it to put everything back.Alt+click is the same solo, widened to the track's associated tracks at the playhead, so picture and its sync sound are dealt with together.Shift+click resets that button on every track and forgets the saved state.
The Keyframes button has no solo, so click and Cmd/Ctrl+click both simply toggle it.
What Lock protects
Lock is the one control that makes a track completely untouchable. A locked track takes no edit, no trim and no cut, is never brought along to hold sync, and is never selected. It also protects the things that live on a track rather than in it: audio levels and fades still display on a locked track but cannot be dragged, and the Cut tool refuses it even with Shift held.
Keyframes and lock are mutually exclusive, since together they would mean a track claiming to be editable while nothing could change it. Turning keyframes on unlocks the track, and locking a track turns keyframes off.
Tip: Lock is the reliable way to keep a track out of an edit. Disabling a track keeps it out of what you target, but Track Sync may still shift it to hold sync - locking it leaves it out altogether.
Master track buttons
Above the track headers is a row of buttons that apply to every track at once, including FX tracks. Each works between two states: the default - every track enabled, unlocked, visible and audible - and your own set-up. Clicking swaps between them: the first click saves your set-up and returns everything to the default, the next brings your set-up back. Shift+click clears that memory, returning everything to the default so you can start again.
| Button | Shortcut |
|---|---|
| Toggle all track enable / disable (targeting) | Ctrl/Cmd+1 |
| Toggle all track keyframes | Ctrl/Cmd+2 |
| Toggle all track locks | Ctrl/Cmd+3 |
| Toggle all track monitors | Ctrl/Cmd+4 |
Track Sync sits in this row too, next to track enable / disable, because what it governs is which tracks come along when material moves. It has no default key, but you can give it one from the Keyboard Shortcuts panel. A Tracks menu sits alongside them for track-level commands.
Track targeting
Targeting decides which tracks an edit affects. When you insert or overwrite from the source viewer, the marked source tracks land on the targeted timeline tracks. Set targets in the track headers so your edits go exactly where you intend.
Track locking
Lock a track to protect it from accidental edits - locked tracks ignore edits and trims. Lock your finished dialogue or a music bed while you work on picture above it.
Track visibility and mute
- For video tracks, the visibility toggle shows or hides that track's picture in the output.
- For audio tracks, the mute toggle silences the track, and solo isolates one track so you hear only it. Solo state stays in sync with the audio mixer in both directions.
- The colours match their meaning: hide/mute shows red (like lock), solo shows yellow.
Track height and display options
You have fine control over how tracks are displayed:
- Individual track heights - set each track to Small, Medium, Large, Extra Large, or Auto, independently or for all at once.
- Default track height - choose the height new tracks start at (in Timeline settings).
- Add tracks above or below the selected track, and delete empty tracks to tidy up.
- Auto Add Tracks - adds enough tracks to take all of the source tracks when you edit.
- Drop Zones - the strip above the video tracks and below the audio tracks; material dropped there lands on tracks Lightworks makes for it (see Basic editing).
- Reorder tracks - move tracks up or down the stack.
Navigating the timeline
- Zoom with
Cmd/Ctrl+ scroll, which pivots smoothly around the playhead. - Scroll the tracks vertically with a plain scroll or swipe, and pan the timeline with
Shift+scroll or a horizontal swipe. What a plain scroll does is your choice - Mouse Wheel in Timeline settings offers Vertical Scroll (the default), Frame Nudge, or Previous / Next Event - and over the track headers it always scrolls the tracks. Precision scrolling gives high-resolution movement where the device supports it. - Timeline Map - a bird's-eye view of the whole sequence, shown in place of the scrollbar, for jumping straight to any section.
- Snapping - magnetic snapping to cuts, markers, and the playhead makes precise positioning easy (toggle it in Timeline settings).
- Dual timecodes - display two independent timecode readouts at once, such as sequence and source time.
More navigation and the timeline toolbar are covered in Timeline tools and commands.