
Welcome to Lightworks - a professional video editor used for everything from social clips and YouTube videos to documentaries, music videos, and feature films. This article introduces what Lightworks does, what's new in v2026, and how to find your way around this knowledge base.
If you just want to make your first edit, jump straight to Quick start: create your first edit.
What is Lightworks?
Lightworks is a non-linear editor (NLE): software for assembling video, audio, graphics, and effects into a finished programme. "Non-linear" simply means you can work in any order and change your mind freely - nothing is committed to tape.
A single, consistent workflow takes you all the way from raw footage to a finished file, and you can work in any order along the way. The five stages are covered in The Lightworks workflow at a glance, below.
Lightworks runs on Windows, macOS, and Linux, and your projects move between them. It comes in three tiers - Free, Create, and Pro - each unlocking more formats, resolutions, and tools as you go. Throughout this knowledge base, features that need a paid tier are flagged inline (see Conventions used in this guide below).
Tip: Lightworks saves your work continuously. There's no Save button, and you don't need one!
What's new in v2026
Lightworks v2026 is a major step forward, with a refreshed look and improvements across the whole application. v2026.1 is the first in a series of large updates - it lays new foundations, with much more to come.
Here are the headline changes. Each area has its own detailed article elsewhere in this knowledge base.
- A new look - refreshed theme, the Inter typeface, crisp SVG icons, redesigned cursors, and better high-DPI scaling.
- Layouts - updated default layouts plus multi-tab layouts (up to four open at once) and an improved Layout Designer and Chooser.
- Projects and organisation - Project Spaces for grouping projects, built-in project backup, enhanced Collections, drag-and-drop Tags, and smarter saved searches.
- Import - a streamlined Import panel that can stay open, with control over which bin media lands in.
- Effects - the new Reframe effect for multi-format delivery, a refreshed Effects Settings panel with effect reordering, and granular copy-and-paste of effects.
- Viewers - framing guides and safe areas, viewer zoom (10-400%, even during playback), and easier access to playback quality.
- Info panel - a single, context-aware panel for Source and Sequence information, with the viewer overlay controls built in.
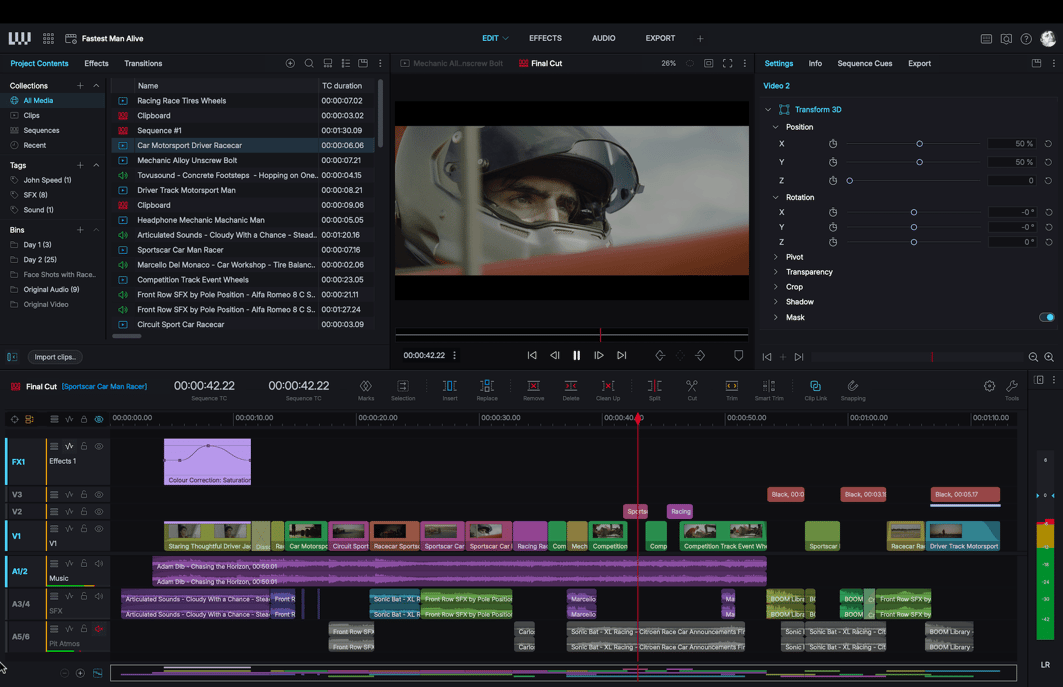
- Timeline - redesigned track headers, flexible track operations, precision scrolling, a Timeline Map, advanced trimming, dedicated Cut and Selection tools, and keyframing on every track.
- Speed - a new Speed panel for retiming clips by percentage or target duration, including smooth reverse playback.
- Sequence versions - create and switch between versions of a sequence from the Versions tab.
- Keyframes and fades - timeline keyframing with new ease curves, plus dedicated video and audio fade controls.
- Audio mixer - one unified mixer for clips and sequences, with full automation, grouping, and flexible routing.
- Conform and Relink - new tools for replacing and re-linking media.
- Export - a single combined Export panel with export presets you can favourite or set to start automatically, and Same as Source. The Free plan now exports up to 1080p, including portrait formats.
Warning: v2026.1 introduces foundational changes to project data. We've addressed everything we're aware of, but full backwards compatibility with earlier versions can't be guaranteed - back up your projects before opening them in this version.
For the complete list of changes, see the v2026 release notes.
The Lightworks workflow at a glance
Most projects follow the same five stages, and this knowledge base is organised to match.
- Import - bring footage, audio, and images into your project.
- Organise - sort material into bins, tag it, and find it fast.
- Edit - mark the parts you want and build them into a sequence on the timeline.
- Finish - add transitions, effects, colour, titles, and mix your audio.
- Export - render a finished file or publish it online.
You won't always work strictly in this order - editing is rarely tidy - but it's a reliable mental model when you're starting out.
How this knowledge base is organised
Everything you're reading lives in one searchable knowledge base, built right into Lightworks. You don't need to read it cover to cover - most people search for what they need, when they need it.
The content is grouped to follow the workflow above, from getting started, through projects and media, timeline editing, audio, effects, colour, titles, and export, finishing with advanced workflows and reference material.
- Search first. Type what you're trying to do into the help search - articles are written to be found and read on their own.
- Follow the path. If you're new, the order below takes you from zero to a finished edit.
A recommended path for new users
If you're new to Lightworks, work through these in order:
- Quick start: create your first edit - a short, end-to-end first project.
- The Lightworks interface - get comfortable with the main panels.
- Projects and Importing media - set up a project and bring in footage.
- Basic editing and Trimming - build and refine a sequence.
- Audio basics - balance your levels.
- Export overview - deliver your finished video.
Everything else - effects, colour, titles, multicam, and advanced delivery - builds on these foundations.
Getting help and learning more
You're already in the right place: the in-app help panel is the fastest way to find an answer while you work.
- In-app help - search this knowledge base directly inside Lightworks.
- Video tutorials - watch features and workflows in action at lwks.com/tutorials.
- Community forum - ask questions and share techniques with other editors at forum.lwks.com.
- Website - visit www.lwks.com for downloads, news, and pricing.
- User portal - manage your licences and account details at app.lwks.com.
Conventions used in this guide
A few conventions are used throughout, so it's worth knowing them up front:
- Keyboard shortcuts appear in this style:
Space,J,K,L. Where a modifier differs by platform, it's writtenCmd/Ctrl- useCmdon macOS andCtrlon Windows and Linux. - Menu paths are written with arrows, for example File > Import.
- Licence tiers are flagged inline: Create means the feature needs a Create or Pro licence; Pro means it needs a Pro licence. Anything unmarked is available to everyone, including Free.
- Callouts highlight asides: Tip for suggestions, Note and Info for context, Warning for things that risk data loss, and Danger for irreversible actions.