
The Lightworks v2026 interface has had a thorough refresh - a new theme, crisp SVG icons, the Inter typeface, and better scaling on high-DPI and mixed-monitor setups - but the underlying layout stays familiar. This article gives you the lay of the land so the rest of the knowledge base makes sense.
There are two main screens: the Project Browser, where you choose what to work on, and the project window, where you actually edit.
Lightworks arranges the project window in one of two ways. The fixed layout is the default, and what this tour describes: tidy, task-based arrangements where everything has its place. There's also a flexible layout for free-form workspaces, introduced at the end of this article.
The Project Browser
The Project Browser is the first thing you see. It shows your projects as tiles and is where you create, open, organise, and back them up.
- Project Spaces let you group projects however you like, and can live anywhere on your system or network.
- Project backup is built in, straight from the Browser.
- A new version notification appears at the top when a new version of Lightworks itself is available - click it to go to the download.
To get going, see Quick start: create your first edit.
The project window at a glance
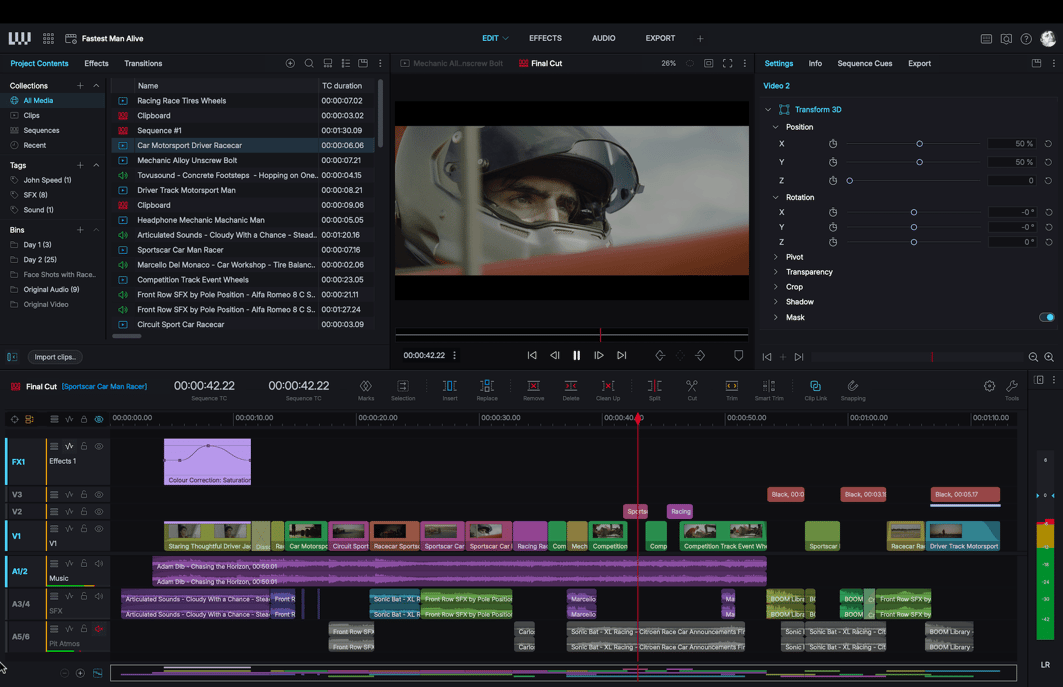
Open a project and you're in the project window. A Project Browser button at the top of the application takes you back to your projects, and a settings icon next to the project name opens the project's settings (see Project settings reference). The window's main areas are:
- Content Manager - everything in your project: a Navigator column of Collections, Tags, Searches, and Bins alongside the content view of your clips, subclips, and sequences.
- Viewers - where you watch source clips and your sequence.
- Timeline - where you assemble and edit your sequence.
- Info panel and tool panels - metadata, effects, and the audio mixer.
The Content Manager
The Content Manager is home to everything in your project. It has two parts: the Project Navigator column, which is how you find things, and the content view, which shows the clips, subclips, and sequences in whatever you've selected.
The Navigator lists:
- Collections group related material.
- Tags label clips so you can gather them quickly - drag and drop a clip onto a tag to apply it.
- Searches find content by your own criteria; they can be saved, edited, and set to update live or stay fixed.
- Bins are containers you fill manually, each showing an item count.
You can show or hide the Tags, Searches, and Bins sections to suit how you work, the Navigator column is resizable, and in the fixed layout you can hide it entirely with the toggle next to the Import button.
The content view offers both Tile and List views, and each bin or search can remember its own view. For more on organising, see Organising your content.
Viewers
Lightworks uses two viewers:
- The source viewer plays the clip you're reviewing.
- The sequence viewer plays your edit.
You can tell them apart by the coloured icon in each viewer's header - blue for source, red for sequence. Transport controls, marks, and the scrub bar sit below the image. Viewers now support zoom, framing guides, and easy access to playback quality - all covered in Viewers and playback.
The timeline
The timeline holds your sequence as a stack of video and audio tracks.
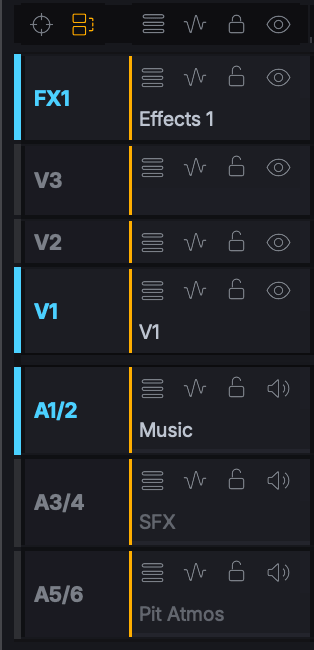
- Track headers carry each track's own controls: the compact label (
V1,A1) is the enable/disable tab that decides whether the track takes part in an edit, alongside an editable name, a Track Options menu, and Keyframes, Lock and Monitor (mute/visibility) buttons. Audio headers add a PPM meter, and a slim amber strip shows when a track will be held in sync as material moves. - Master track buttons above the headers apply to every track at once - enable, Track Sync, keyframes, locks and monitors - toggling between the default state and your own set-up.
- The timeline toolbar holds the edit tools (including dedicated Cut and Selection tools), the trim controls, and the behaviours Clip Link and Snapping. It can be reduced to just the behaviours and timecodes with Show Edit Tools.
- Two timecode readouts sit on the header, so you can watch sequence and source time side by side; the second one can be switched off.
- Format, Colour Space, Quality and Timeline settings sit on the header as well - Timeline settings being where the timeline's own appearance and behaviour options live.
- A side menu at the right edge, behind a toggle, holds Search, New, Voiceover, Conform, Render, and Export.
- Drop Zones above the video tracks and below the audio tracks accept dropped material and create the tracks it needs.
- The Timeline Map gives a bird's-eye view for jumping around long sequences.
Editing on the timeline is covered in Basic editing and Trimming.
The Info panel
The Info panel is a single, context-aware home for metadata.
- Modes: show Source, Sequence, or Auto (which follows whatever is active).
- Tabs: Metadata, Associates, and Versions, each clearly separated. In Source mode there's also a Video and Audio tab showing the source's own timeline (this doesn't appear for sequences).
- Overlays: the viewer overlay controls now live here too - metadata overlays such as timecode, names, date, reel IDs, and custom labels.
Tool panels
Most work beyond cutting happens in dedicated panels - the Effects Settings panel, the audio mixer, and the Export panel among them. Each layout includes the panels suited to a particular workflow, and you can turn individual panels on and off within it: in the fixed layout, click a panel's panel chooser icon for a drop-down list of panels to show or hide.
Menus and context menus
Alongside the main menus, Lightworks leans heavily on right-click context menus. Track headers, segments, cut points, tiles, and viewers all have their own menus, and they're usually the fastest route to the command you need.
Status messages and notifications
Lightworks surfaces progress and warnings as status messages. Background jobs such as imports and exports report their progress, and the new version notification sits at the top of both the Project Browser and the project window.
Arranging and resizing panels
You can resize most areas by dragging their borders - the Content Manager, viewers, and audio mixer included.
The fixed layout
Everything above describes the fixed layout - the default, and the way we recommend most people work. Preset arrangements are tailored to specific tasks (Edit, Effects, Audio, Export, and more), you can have several open as tabs and switch between them instantly, and panels always land somewhere sensible, so there's nothing to tidy up.
On a two-monitor setup, the fixed layout keeps the interface on one display and can send full-screen video output to the second display.
The flexible layout
The flexible layout takes the opposite approach: you place panels and viewers wherever you like, overlap them, and organise them into rooms you can switch between - a workspace built exactly your way.
Its particular strength is multi-monitor work: unlike the fixed layout, the flexible layout can spread the interface itself across two displays, not just the video output.
To try it, go to the Project Browser, open Settings, and switch the layout mode to flexible.
Choosing, switching, and building layouts of both kinds is covered in Layouts and workspaces.