
All audio in Lightworks flows through the audio mixer, where you set levels, pan, mute, solo, and automate the balance of your tracks. In v2026 the mixer gained full automation and flexible routing, making it a proper mixing console for finishing your sound.
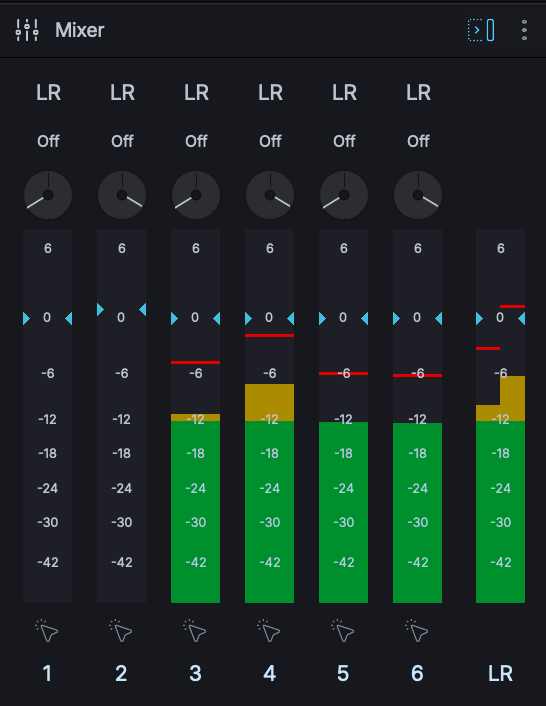
Mixer overview
Open the mixer from the Audio layout (see Layouts and workspaces). It shows a channel strip for each audio track plus a master strip, with meters showing live levels. The mixer is resizable, and a slimline monitor mode gives a compact, meters-only view when you just need to watch levels.
In v2026 there is one unified mixer for both source clips and sequences. By default it auto-switches to whatever has focus; the mixer's settings menu lets you pin it instead - the Audio Mixer option offers Source, Sequence, or Auto Switch. In fixed layout mode the mixer can also be expanded, and it remembers its expanded size.
Channel strips
Each track has its own channel strip carrying its fader, meter, pan or balance, and mute and solo controls. The strip is where you shape one track's contribution to the mix.
Faders
The fader sets a track's level. Drag it up or down to balance that track against the others; click it to reset to its default. Watch the meter as you go so the track sits at a healthy level without clipping.
Pan and balance
The pan / balance control places a track in the stereo field, left to right. Drag it to position a sound, or to spread music and effects across the stereo image. A stereo pair uses a balance control to weight left against right.
Mute and solo
- Mute silences a track.
- Solo isolates a track so you hear only it; the solo button lights to show it's active.
Use solo to focus on one element while mixing, and mute to drop a track out of the mix.
Mute and solo are the same controls as the Monitor buttons in the timeline's track headers, and the two stay in step in both directions - solo a track here and its header shows it, and vice versa. In the track headers, Cmd/Ctrl+click on Monitor isolates that track directly (see Sequences and timelines).
Mix routing
In fixed layout mode the mixer provides three independent mixes plus the LR master output. Routing lets you send tracks to different mixes - useful for building a separate mix-minus, a clean dialogue stem, or a monitor feed alongside your main mix.
Automation modes
Automation records and plays back your fader and control moves over time, so the mix changes dynamically as the sequence plays. Choose a mode per the table below:
| Mode | Behaviour |
|---|---|
| Off | Acts like legacy Lightworks - downstream output levels only, no automation |
| Read | Follows existing automation; you can override by moving a fader, but moves are not written |
| Write | Writes automation from the moment you press play |
| Touch | Writes only while you are moving a fader, otherwise reads existing automation |
| Latch | Writes while you move a fader, then keeps writing at the level you left it |
Reading and writing automation
A typical workflow:
- Set rough static levels with automation Off or in Read.
- Switch a track to Touch or Write and play the sequence, riding the fader to follow the action (bringing music down under dialogue, for example).
- Return to Read to play back your automation without changing it.
Use Touch for spot fixes (it only writes while you hold the fader) and Write or Latch for passes where you're shaping a whole section.
Grouped channels and stereo pairs
Channels can be grouped or linked as a stereo pair, so their faders and automation move together. This keeps a stereo source balanced and lets you control related tracks as one. Group tracks that belong together; ungroup to adjust them separately (see Audio basics).
Saving and reusing mixer setups
The mixer's settings menu can save and load configurations, so a balance you like isn't locked to one sequence:
- Save configuration / Load configuration - store a mixer setup and recall it later.
- Apply to existing clips/sequences - push the current mix onto items already in the project.
- Use as default for future sequences / future clips - make the setup the starting point for new material.
Hardware control
With a Pro licence, Mackie-compatible mixing consoles (MCU and extenders) drive the mixer with real faders - a natural fit for automation passes (see Keyboard, mouse, and control surfaces).
Master output controls
The LR master strip sets the overall level of the mix and is what your meters reference for the final output. Balance individual tracks first, then use the master to set the overall level for delivery. Keep the master out of the red so your exported audio doesn't distort.
Tip: Mix in passes: get static balances right first, then add automation only where the mix needs to move. It's faster and easier to revise than automating everything at once.