Exporting

Applies to 2022.3 onwards

Free
Create
Pro

Once work is complete on a sequence it can be exported out of Lightworks as a single continuous file, an archive, or as a sequence that can be shared with other editing systems.


NOTE: The range of export formats available to you varies according to the version of Lightworks (Free, Create or Pro) that you have.

Exporting a Clip, Subclip, or Sequence

1

The Export panel is located in the top-right-hand corner of the ASSEMBLE and EDIT tabs.

You can right-click on a clip, subclip, sequence, sequence viewer or timeline and, from the menu that opens, select Export.

2

Select the export format you require from one of the sub-menu headings: User Presets, Targets, Backup, Interchange, Media files, or Camera formats.

Uploading to YouTube

NOTE: You must have a connection to the internet and a valid user account for the video streaming service you want to upload to.

1

Right-click on a clip, subclip, sequence, sequence viewer or timeline and from the menu that opens, select Export.

2

From the Format drop-down list, select YouTube listed under the ‘Social’ category.

3

To upload your media directly:

  1. Click the ‘Sign In’ button. Your web browser loads the YouTube login page.
  2. In your web browser, log into YouTube with your username and password.
  3. When prompted, click ‘Allow.’ This will allow the Lightworks application to upload media directly to YouTube without the need to open the web browser again. The browser can now be closed and you can return to Lightworks.
  4. Once logged in, the button changes to ‘Log out’.
YouTube Upload
4

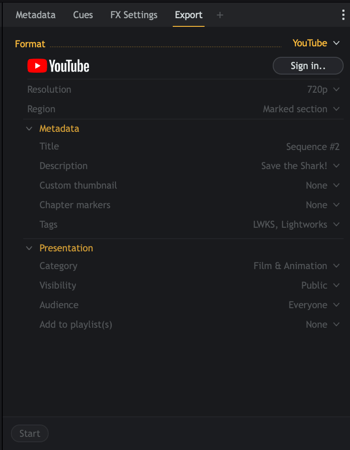
Select the Resolution you require from the Size drop-down list.

Note: Lightworks Free allows a maximum resolution of 720p.

5

Select what you want to upload from the Region drop-down list. Choose from:

  • Marked section: Uses the Mark In and Out point on the sequence to export only that section.
  • Whole sequence: Exports the entire sequence from start to finish, including any black areas.
  • Ignore leading/trailing black: Exports only the sections with clips, making sure not to include any black areas at the start or end of the sequence.
6

Optional: Change the Title of your video.

7

Optional: Add a Description for your video to give more detail to viewers. You can also add a signature that will remain constant for all YouTube uploads. Emojis can also be added.

YouTubve signed in
8

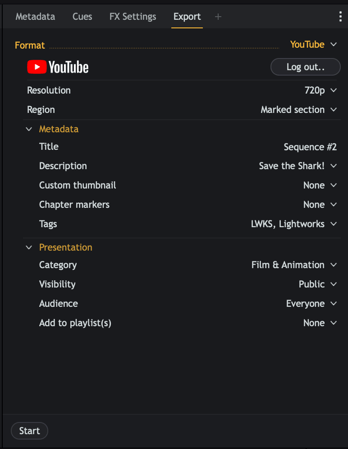
Optional: Choose a custom thumbnail image to upload with your export:

  1. Click the dropdown arrow next to ‘None’.
  2. Click ‘Choose’
  3. On the panel that opens, select the appropriate tab where you want to use the thumbnail image. This can be from the project (if you have imported still images) from your local machine or from the sequence itself (scrub through the viewer to find the image to use)
  4. Select the thumbnail image and click ‘OK”.
9

Optional: Select the colour of cues to be used as chapter markers in the uploaded file.

Note: You must have added Cue Markers to your sequence for these to work. Please see ‘Adding Cue Markers’.

10

Optional: Type in the text separated by commas for each tag you want to appear.

11

Optional: Choose from the fixed list of categories that your uploaded video applies to.

12

Optional: Choose the visibility of the uploaded video: Public, Private or Unlisted.

13

Optional: Choose which audience can see your uploaded video: Everyone, Children or Adults (18+).

14

Optional: Choose which Playlist the uploaded video will be assigned to.

Note: You must have created a Playlist within your YouTube account.

15

Click ‘Start’.

  1. The Project Card opens, displaying the export progress in the Tasks tab.
  2. Click on the image thumbnail to view the export task in a larger window.
  3. When the export has been completed, a report is displayed in a Tasks Log window and hyperlinks to view the uploaded video on YouTube.

Uploading Exports to Cloud Storage Providers

When exporting your work, the export panel has the option to ‘Upload’ your exported file to the cloud storage provider of your choosing.

Note: You must have an active Lightworks Create or Pro license, a connection to the internet and a valid user account for the cloud storage provider you want to upload to.

1

Add the cloud storage provider of your choice following the instructions in the ‘Adding the Cloud Storage Provider’.

2

Right-click a sequence and choose ‘Export’.

3

Choose the export option from the export panel.

Note: Not all export options have the upload option. (Please see the Cloud Storage Library Limitations list below)

4

Click the dropdown arrow next to ‘Cloud Upload Location’.

A cropped screenshot of lightworks
5

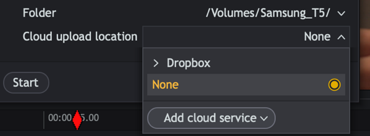
Any cloud storage providers already signed in will be available to choose from the list

6

You can add a storage provider directly from the export panel by clicking the ‘Add cloud service’ button and following the instructions in the ‘Adding Cloud Storage Libraries’ section above.

7

Select the cloud storage provider you wish to upload to.

8

Click ‘Start.’

9

The export process will begin first by creating the file locally and then uploading it to the chosen provider.

10

When the export/upload completes the Tasks panel will appear with two links, one for where the local file was created and one for where the file was uploaded.

Cloud Storage Library Limitations

The following export options do not have the ‘Cloud upload location’ option:

  • Reaper
  • Film Cutting List
  • EDL
  • Image Sequence
  • Lightworks Archive
  • Vimeo/YouTube
  • P2 AVC-Intra

Not all exported files will be playable within your chosen cloud storage provider web browser but they should all be accessible and playable from within the Lightworks ‘Libraries’ Section. 

Note: We retrieve the thumbnail image from the cloud storage provider, and since they cannot decode all file types, some files (MXF, etc) may appear within the library with ‘No preview’ shown as the thumbnail image. When clicking on the thumbnail image for a file, an image will appear but will not be saved.