Trimming Cuts

Applies to 2022.3 onwards

Free
Create
Pro

Overview

Trimming within Lightworks is extremely powerful and flexible. This Guide touches on the basics of Trimming, which is the process of shortening/extending a clip within a sequence, slipping a clip or sliding a clip up/down the sequence timeline. 

By default, the video and audio are linked together as a single clip when trimming, this is known as ‘Auto track sync’ This is useful for trimming video and audio at the same time to avoid losing sync and to speed up trimming.

Disable Track Sync

There will be times when trimming needs to happen on different tracks at different times:

1

Select the EDIT tab

2

On the sequence timeline, click the ‘Toggle track sync’ icon.

Disable Track Sync
3

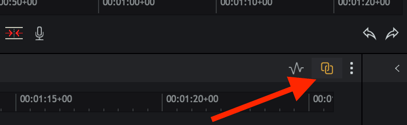
The icon will change and grey out and auto track sync will be disabled.

4

Clip tracks can now be trimmed independently from one another.

Trimming an Outgoing Clip

Outgoing trim
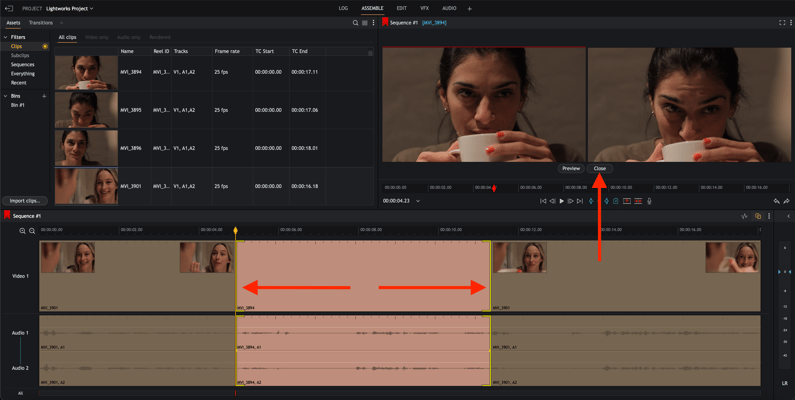
Trimming an outgoing clip changes the end point of the outgoing clip (A) while the start of the incoming clip remains unchanged (B).

1

Do one of the following:

  • Hover your mouse close to the end of the clip you want to trim. When white brackets display, click the mouse button.
  • Right-click on the clip you want to trim, and from the menu that opens, Trim > Trim Out.
  • Park the timeline marker over the clip you want to trim and press the Trim Out shortcut key. 
2

Brackets display in yellow on tracks, denoting that the clip has been unjoined from the cut.

Trim Outgoing copy (with arrows)
3

Shorten or lengthen the outgoing clip by doing one of the following:

  • Moving the mouse left or right while holding down the mouse button. Release the mouse button to set the cut point.
  • Pressing the Play button on the viewer. Holding down the SHIFT key then pressing the Play button on the viewer will play in reverse.
  • Pressing the play (spacebar or L) or reverse playback (J) shortcut keys 
  • Nudging frame forward (. or right arrow) or backwards (, or left arrow) shortcut keys
4

When trimming is complete, click the ‘Close’ button under the sequence viewer or click the cut point; this will join the cut back up with the rest and close trimming mode.

Trimming an Incoming Clip

Incoming Trim
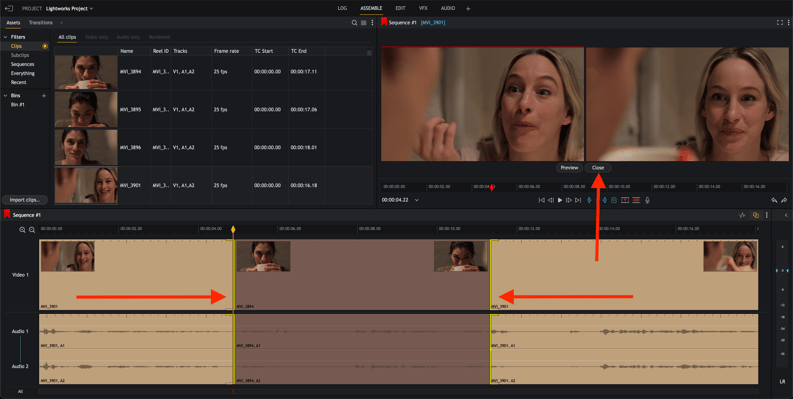
Trimming an incoming clip changes the start point of the incoming clip while the end of the outgoing clip remains unchanged.

1

Do one of the following:

  • Hover your mouse close to the start of the clip you want to trim. When white brackets display, click the mouse button.
  • Right-click on the clip you want to trim, and from the menu that opens, select Trim > Trim In.
  • Park the timeline marker over the clip you want to trim and press the Trim In shortcut key. 
2

Brackets are displayed in yellow on the clip, denoting that it has been unjoined from the cut.

Trim Incoming (with arrows)
3

Shorten or lengthen the incoming clip by doing one of the following:

  • Moving the mouse left or right while holding down the mouse button. Release the mouse button to set the cut point.
  • Pressing the Play button on the viewer. Holding down the SHIFT key and then pressing the Play button on the viewer will play in reverse.
  • Pressing the play (spacebar or L) or reverse playback (J) shortcut keys 
  • Nudging frame forward (. or right arrow) or backwards (, or left arrow) shortcut keys
4

When trimming is complete, click the ‘Close’ button under the sequence viewer, or click the cut point; this will join the cut back up with the rest and close trimming mode.

Moving a Cut

moving cutMoving a cut is where both the end of the outgoing clip and the start of the incoming clip move.

1

Do one of the following:

  • Hover your mouse in the middle of the cut you want to trim. When white brackets display on both sides of the cut, click the left mouse button.
  • Position the timeline marker over the cut you want to trim, and then press the ‘Move Cut’ shortcut key (U).
2

Brackets display in yellow on both sides of the cut showing both are unjoined.

Moving a cut (with arrows)
3

Shorten or lengthen both sides of the cut by doing one of the following:

  • Moving the mouse left or right while holding down the mouse button. Release the mouse button to set the cut point.
  • Pressing the Play button on the viewer. Holding down the SHIFT key and then pressing the Play button on the viewer will play in reverse.
  • Pressing the play (spacebar or L) or reverse playback (J) shortcut keys 
  • Nudging frame forward (. or right arrow) or backwards (, or left arrow) shortcut keys
4

When trimming is complete, click the ‘Close’ button under the sequence viewer or click the cut point between the yellow brackets. This will join the cut back up with the rest and close trimming mode.

Slipping a Clip

slipping a cutSlipping a clip is where you change the In and the Out points of a clip simultaneously.

1

Do one of the following:

  • Hover your mouse over the start of the clip you want to trim. When white brackets display, click the mouse button. Repeat for the end of the clip.
  • Right-click on the clip you want to slip, and from the menu that opens, select Trim > Slip.
  • Press the Slip shortcut key (Y).
2

Brackets display in yellow at both ends of the clip showing both are unjoined.

Slipping a cut copy
3

Change the start and end frames of the clip by doing one of the following:

  • Moving the mouse left or right while holding down the left mouse button. Release the left mouse button to set the cut point.
  • Pressing the Play button on the viewer. Holding down the SHIFT key then pressing the Play button on the viewer will play in reverse.
  • Pressing the play (spacebar or L) or reverse playback (J) shortcut keys 
  • Nudging frame forward (. or right arrow) or backwards (, or left arrow) shortcut keys
4

When trimming is complete, click the ‘Close’ button under the sequence viewer, or click each of the cut points, this will join the cuts back up with the rest and close trimming mode.

Sliding a Clip

Sliding a cutSliding a clip is where you move the entire clip up or down the sequence timeline.

1

Do one of the following:

  • Hover your mouse over the end of the first clip you want to trim. When white brackets display, click the mouse button. Repeat for the start of the last clip.
  • Right-click on the clip you want to slide, and from the menu that opens, select Segment Commands > Slide.
  • Press the Slide shortcut key (T).
2

Brackets display in yellow at the end of the first clip and the beginning of the last clip showing the cuts are unjoined.

Sliding a clip copy
3

Shorten or lengthen the outgoing clip by doing one of the following:

  • Moving the mouse left or right while holding down the mouse button. Release the mouse button to set the cut point.
  • Pressing the Play button on the viewer. Holding down the SHIFT key then pressing the Play button on the viewer will play in reverse.
  • Pressing the play (spacebar or L) or reverse playback (J) shortcut keys 
  • Nudging frame forward (. or right arrow) or backwards (, or left arrow) shortcut keys
4

When trimming is complete, click the ‘Close’ button under the sequence viewer, or click each of the cut points, this will join the cuts back up with the rest and close trimming mode.